Installation Troubleshooting
How do I create an EFI boot stick?
There are two methods for creating a boot stick to install LAD on your hardware. The primary way to do this is to generate and download an EFI file image from the configurator page for the installation module and place it on a USB stick (this is the same process you would use to create any other EFI-type bootable stick for most modern operating systems):
- Download the installation module and save it as "bootx64.efi".
- On a blank USB stick with FAT formatting (most USB sticks have FAT formatting), create the following file structure: EFI/BOOT/.
- Please note that if you are re-using a USB stick you must remove the old files from it.
- Copy the bootx64.efi file into the BOOT folder.
*IMPORTANT! DO NOT BOOT UP YOUR PC OR LAPTOP USING THIS BOOT STICK! Most modern systems recognize EFI and UEFI files and are capable of booting up from them. If you boot up your PC or laptop using this bootable stick, they will be reformatted and LAD installed on them. If this is not what you want, take care not to mix up this bootable USB stick with any other USB sticks you may have! Only use this bootable USB stick to boot up the hardware on which you wish to run LateralAccessDevice.
Most modern operating systems recognize EFI/UEFI files, but if yours does not, you can create a boot stick using an alternative method. Please see below.
My system doesn't work with EFI / UEFI. What can I do?
If the computer on which you wish to install LAD does not correctly boot EFI or UEFI, you will need to use an alternate process to generate a boot file image and "burn" it to a USB stick. For this you will need to return to the configurator page and click on the link to get the alternate installation module and burn it to a USB stick.
My hardware won't boot up from the USB stick.
Check whether the computer on which you wish to install LAD is set to boot up from the USB stick. Most systems have USB as their default primary boot setting, however, there are always exceptions. To check your boot order you need to access the boot order in the BIOS (aka CMOS, Setup Utility or similar). To do this you will need to connect both a monitor and a keyboard to the computer.
- With most machines you access the BIOS/CMOS by pressing either DEL, F1, F2, F9, F11, F12 or ESC keys when it is booting up, though it is possible your particular computer may use a different key (check the documentation that came with your hardware).
- Navigate to the Boot Order or Boot Preferences (may be named slightly differently, depending on your system)
- Set the primary boot selection to USB.
- Save settings and restart the machine.
When you restart the machine, in order to proceed with installation you must have the boot USB stick inserted in one of the computer's USB ports and a live connection to the Internet.
Example: Changing BIOS on N5105 Motherboard
- As machine starts up, press DEL several times, until the BIOS come up.
- Use the left and right arrow keys to navigate to the BOOT tab.
- Use the up and down arrow keys to navigate to Boot Option #1 and change it to USB/USB Device.
- You may set the second boot device to HDD.
- Use the arrow keys to navigate to Save Changes and Exit. Select Yes when asked to confirm if you would like to save changes and exit.
There are some other settings that are optional but it may be a useful idea to check:
- Serial Port Console Redirection (likely under "Advanced" tab): Disable.
- Network Stack (likely under "Advanced" tab): Disable.
- Sata Config (likely under "Chipset" tab in PCHIO Config section): Set to AHCI (this is a setting to check if during installation it cannot find the hard drive).
- Restore AC Power Loss (likely under "Advanced" or "Power" tabs): Enable (this sets the machine to automatically power back on when power returns after a power loss).
I can't access the BIOS.
First check your hardware's documentation for the correct way to access the BIOS (aka CMOS, Setup Utility and other similar names). If you do not have the documentation that came with it, you can check the manufacturer's website. The keys given above for accessing the BIOS are not the only possibilities, and the exact method to access it can vary from manufacturer to manufacturer and from product to product. 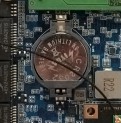
If you still are unable to access the BIOS and you are comfortable opening up computers and working with the hardware, you can try temporarily removing the motherboard's coin cell battery to reset the BIOS to the factory default settings (and most modern systems' factory defaults have USB as the primary boot option).
At right is pictured the typical coin cell battery as installed on a motherboard.
I set my primary boot source to USB, but the installer isn't launching.
- It is possible for USB ports to go bad or malfunction, so the first thing to try is connecting the boot stick to a different USB port.
- We have also come across some systems that do not always preserve changes to the boot order, particularly if the system is started up without a USB stick present (or it cannot detect the USB due to a faulty USB port or improper insertion). In fact we have come across some systems in our testing that would always change the primary boot selection to the hard drive if you booted up without the USB stick inserted, even if you had previously changed the boot order.
How do I know which port on the computer is the first, so I can connect it to the Internet?
- There is no hard and fast rule, but motherboards with built-in Ethernet ports often have them labeled numerically. If no separate NICs are connected, the sequence of the ports will typically follow the numerical labelling on the motherboard or the outside of the chassis itself.
- Please note that we have come across some devices where the numbering does not correspond, for example, the first may be last and the last first, or the first the second, the second the third and the last the first.
- If you have separate network interface cards connected to the motherboard, it varies from motherboard to motherboard whether the motherboard's built-in ports take numbering precedence or the NICs do. Probably more often not the motherboard gives precedence to its own ports, but not always.
- You may simply have to go through some trial and error to find the correct port to which to connect the Internet. If you connect a monitor to the chassis on which you are installing LAD, the installer module will instruct you to connect the Internet source if it is not correctly connected. If you do not get this message and installation proceeds, then you have connected to the correct port.
- After you have completed installation, you can discover the numbering of the rest of your ports, if you wish, using the NET logs (under Sys Info). Simply connect another computer into one of the Ethernet ports and see what number it reports as connecting in the NET logs.
How can I tell if installation was successful?
- The easiest way to monitor the progress and success of the installation module is to watch its progress by connecting a monitor to the computer chassis during installation. This would allow you to see if there were any incompatibility or other error messages, as well as see when installation is complete.
- You may attempt to access LAD using the web-based user interface. Attempts to access the web-based user interface prior to completion of installation will fail, so if it doesn't work at first, try again in a few minutes.
Tracking the progress of installation without a monitor
- As the machine boots up and begins installation, the HDD light will turn on and remain lit for three to five minutes.
- The HDD light will turn off for 15-30 seconds.
- The HDD light will turn back on briefly, then turn off again. At this point installation has completed and you may try to log in using the web interface.
- After a short pause, the HDD light will turn on again as the system proceeds to test and reformat the HDD, checking for errors.
- This process may take several hours to complete, depending on the size of the hard drive, however, during this time the system will be up and operational.
- You may use LAD and reboot it during the reformatting process. Keep in mind that rebooting during the reformatting process may take 15-20 seconds due to the ongoing reformatting process (this delay will disappear after reformatting has completed).
What do I do if I get a "Fail!" message?
The "Fail!" message indicates that the installer module ran into some sort of error (other than an issue with incompatible hardware). This is a rare occurrence and is only of concern if you get the fail message at the end of the installation process repeatedly. If it gets a FAIL error during the installation process, the LAD installer will attempt to correct it by restarting the installation process.
If it happens to you, we would appreciate the feedback but may not be able to address it right away. Make note of the error code given and email it to support@lateralaccessdevice.com.
I am setting up LAD behind my old firewall/router. The installer seems to boot up and start installation, but after connecting to the Internet it times out and restarts.
In some circumstances, if LAD is located behind a firewall, it is possible that the firewall is preventing LAD from completing installation.
- If the firewall is preventing LAD from accessing the Internet during installation, the installer may not be able to complete installation. Usually when this happens, the LAD installation module will reboot and try again.
- Make sure that the firewall is not blocking or altering LAD's connection or communications.
- Though the standard operation for a firewall is not to alter the packets that pass through it, some firewalls do. When the firewall alters the packets that LAD sends to our servers to complete installation, the packets that arrive at our servers would be unrecognizable. To address this, the firewall settings need to be adjusted to allow LAD unimpeded and unaltered access to the Internet. In the alternative, LAD may be connected directly to the Internet without an intervening firewall, or you may connect it through a different irewall that does not block or alter its packets.
LAD seems to have installed, but when I reboot or power-cycle it, it starts reformatting again and all the old data is gone.
Check to see if the USB stick you used for installation is still in the machine. If it is, the machine would reboot from the USB stick and go through the installation process again. Once you have installed LAD on your machine, you should remove the installation USB stick, label it and keep it in a safe place.
In some circumstances, if LAD is located behind a firewall it is possible that the firewall is preventing LAD from completing installation. See "I am setting up LAD behind my old firewall/router. It seems to boot up and start installation, but after connecting to the Internet it times out and restarts" above.
I want to connect LAD to my Internet source. What do I keep? What do I replace?
Whether or not you have the modem at your location or just an Ethernet cable coming out of the wall, there is modem somewhere from which the Ethernet cable that is your Ethernet sources connects from. Most likely you already have a router and/or firewall in place behind the modem, between the modem and the rest of your equipment. It is this router/firewall that LAD would replace, if you wish it to connect directly to your Internet connection.
- In some cases you may have a modem/router combination. If you wish to use LAD instead of the routing features of the modem/router and to improve, you can switch the modem into bridge mode and put the internet connectivity settings (if other than DHCP) into LAD.
You do not have to replace your current router (or router/firewall as it may be) with LAD, but there are advantages to be gained in speed, functionality and security.
 |
The graphic at left illustrates a configuration where the modem is on site. LAD would be placed where the router is pictured. |
The graphic at right illustrates a configuration where the modem is located outside the premises and on-site an Ethernet cable comes out of the wall (or may be plugged into a receptacle in the wall) for Internet connectivity. |
 |
What about the PPPoE, VLAN and other settings?
Most cable and fiber Internet services use straight DHCP, so if you have cable or fiber Internet you most likely would not need to do anything with those settings.
DSL uses PPPoE, VLAN and other settings more often than cable or fiber do. The simplest way to approach the question of whether you need the settings is if you already have them and know them, use them. If you do not, don't and use DHCP. If you know that you need them, but don't know what they are, you should be able to get them from your ISP, or possibly by logging into and checking the settings on your existing equipment.
Static IP addresses are rarely used and if you have one, you most likely requested it and already know what you are doing.
In any case, if the settings you put in don't work, LAD will try to use DHCP. If that doesn't work for your Internet connection, for installation purposes you can place LAD behind the current router, so that it can supply the internet connectivity to LAD during installation and then set about changing or correcting the settings in LAD's user interface after installation has successfully completed.
Why am I getting a "Memory Map Failed" error?
You are getting this error because the BIOS or motherboard settings are interfering with LAD's ability to map the memory, which prevents it from running. This is typically caused by Legacy CSM support in older motherboards. Since the early 2010s BIOS / CMOS have been migrating away from this toward UEFI-only, which typically does not interfere with memory mapping structures. Since 2020 UEFI-only has been pretty much standard to unify the booting process (and avoid issues like memory map errors).
- Some motherboards have the ability to switch between UEFI and Legacy CSM. Try switching to UEFI-only boot mode, if possible. Check your motherboard's documentation to see how to do this.
- If you cannot disable Legacy CSM on your motherboard and switch to the UEFI boot process, it may be necessary to use a different motherboard that does support UEFI.
|