User Guide
Table of Contents
Chapter 1: Introduction / Meet LAD
Chapter 2-1: Installation Tips
Chapter 2-3: Connecting to the Internet
Chapter 4: Configuring a Wireless Network
Chapter 5: Connecting and Managing Clients
Chapter 6: SIP Server / VoIP PBX
Chapter 6-4: Voicemail Boxes / VM Menus
Chapter 6-9: Call Routing & Processing Examples
Chapter 7: Access Controls / Parental Controls
Chapter 10: Network Security / LateralFirewall
Chapter 11: DNS Server and LateralDNS
Chapter 13: Ethernet Packet Capture
Chapter 14: Wireless Packet Capture, Monitoring and Reports
Chapter 15: Settings, NAT Forwarding / Port Mapping and Sys Info
Settings, NAT Forwarding / Port Mapping and Sys Info
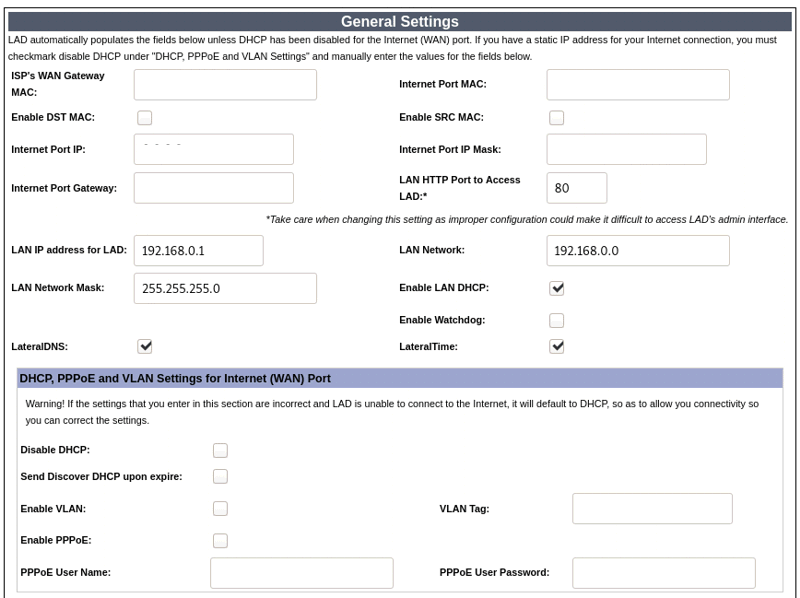
General Settings
You reach the general settings page from the main menu, by clicking on "Settings." Here you will find many of the general settings for LAD, including the settings for connecting to your ISP.
Other than changing the password, all changes made to the Global Settings must be first saved and then LAD re-booted for the changes to take effect.
If you have a DHCP (dynamic IP) connection, many of the first fields will populate automatically. These include:
- ISP's WAN Gateway MAC
- Internet Port MAC
- Internet Port IP
- Interet Port IP Mask
- Internet Port Gateway
If you have a non-DHCP connection, you will need to get the connection settings from your ISP.
You may change some of the other settings, or leave them with the default setting.
- Enable DST MAC
- Enable SRC MAC
- Enable execute disable
- Enable Watchdog: If your hardware has a watchdog timer, checkmarking this enables it (if your hardware does not have a watchdog timer, checkmarking this will have no effect).
- LAN HTTP Port to Access LAD: This is the port a client device would use to access the user interface. The default setting is 80 and unless you have a specific reason for changing it, we recommend keeping the default setting. Care should be taken in changing this as you could make it difficult to access LAD's user interface, particularly if you forget which port you set.
- LateralDNS: Checkmarking this enables LateralDNS.
- LateralTime: Checkmarking this enables LateralTime, a process LAD may use to synchronize its clock to GPS time.
- LAN IP Address for LAD: This is the local IP address for accessing LAD.
- LAN Network: This sets the local network's IP address structure.
- LAN Network Mask
- Enable LAN DHCP: Checkmarking this enables DHCP on the local network.
Other than changing the password, all changes made to the Global Settings must be first saved and then LAD re-booted for the changes to take effect.
NAT Forwarding / Port Mapping
To set up port mapping, click on “Global Settings” from the main menu and scroll down to the “Port Mapping" section. You may enter up to four port ranges.
To set up forwarding for a single port, enter the same port number for the Port From and Port To fields.
The destination IP address should be the local IP address to which you would like to have the port or port range's traffic to be sent. Please only enter the last set of digits into the Destination IP Address field (i.e., the set of digits found after the last period in the IP address: for w.x.y.z, the digits to enter would be "z").
Other than changing the password, all changes made to the Global Settings must be first saved and then LAD re-booted for the changes to take effect.
External Administrative Access
By default LAD only responds to login attempts from within the network. Enabling external administrative access makes it possible to access the login screen and login to LAD from the Internet, including the ability to change settings, which could pose a security risk. The advantages and disadvantages of enabling external access should be carefully weighed before enabling this feature.
If you do decide to allow external administrative access, it is strongly recommended to designate both a specific IP port and an IP address or IP address range from which to allow such access. If you leave these two fields blank, administrative access would be allowed on all IP ports from all Internet IP addresses.
If you decide to allow external administrative access, you have the option to disallow password changes from external Internet locations. For practical and security reasons, you may want to utilize this option to restrict password changes to local network sources, so as to avoid the possibility of someone changing the password externally and locking you out of your own LAD.
When done, click on “Save Changes” at the bottom of the page, then click on “Reboot” at the top of the page to apply the saved changes. Failure to save changes before exiting the Global Settings page will cause the changes to be discarded. The saved changes require a system reboot to go into effect.
Changing the Password
The first time you log into LAD after installation, you will be prompted to select a user name and password. To change the login name and password later click on “Global Settings” from the main menu and scroll down to the password section. Please make note of the login credentials you choose because they cannot be retrieved if forgotten. They, however, may be reset. See Resetting the Password later.
Resetting the Password
While it is not possible to retrieve lost login credentials, it is possible to reset them by reinstalling LAD. Doing so, however, will cause the loss of all data recorded on LAD when the hard drive goes through initialization during the installation process. Because of this, we strongly recommend saving a copy of your login name and password in a safe place.
To reinstall LAD, use the same USB stick and steps used when installing LAD for the first time. The system will go through the exact same installation process as initially, and you will be prompted to choose new login credentials when logging in for the first time after re-installation.
Custom DNS Root Servers
LAD will populate this setting with default DNS root servers at installation, however, you may instead enter the IP addresses of up to four DNS root servers of your choice under the Global Settings. When done, click on “Save Changes” at the bottom of the page, then click on “Reboot” at the top of the page to apply the saved changes. Failure to save changes before exiting the Global Settings page will cause the changes to be discarded. The saved changes require a system reboot to go into effect.
Sys Info
The Sys Info page is reached from the main menu, by clicking on "Sys Info." Here you will find information on system load, system time and HDD health.
- FW Dropped: Counter for packets dropped by firewall.
- PCAP Errors: Counter for errors detected in packet capture.
- Net Logs: Clicking on this pulls up LAD's network logs.
- CPU Index: This number is the expected sustained processing capacity (not peak processing capacity, which can be a misleading metric), a conservative estimate of the processing capacity LAD would be expected to deliver in its current configuration and with the current hardware over a period of time.
- Wi-Fi Index: This number is a conservative estimate of Wi-Fi AES encryption speed, which is a good measure of expected Wi-Fi throughput, since the encryption plays a major role in Wi-Fi speed.
The last section of the System Info page provides information on the hard drive, including a number of statistics on its use. The last three statistics, Reallocation Event Count, Uncorrectable Sector Count and UltraDMA CRC Error Count, are counters that are useful to occasionally check on. If these three counters start incrementing, it is a good indicator that the hard drive is starting to fail.
<< Wireless Packet Capture, Monitoring and Reports | LPN Membership >>