User Guide
Table of Contents
Chapter 1: Introduction / Meet LAD
Chapter 2-1: Installation Tips
Chapter 2-3: Connecting to the Internet
Chapter 4: Configuring a Wireless Network
Chapter 5: Connecting and Managing Clients
Chapter 6: SIP Server / VoIP PBX
Chapter 6-4: Voicemail Boxes / VM Menus
Chapter 6-9: Call Routing & Processing Examples
Chapter 7: Access Controls / Parental Controls
Chapter 10: Network Security / LateralFirewall
Chapter 11: DNS Server and LateralDNS
Chapter 13: Ethernet Packet Capture
Chapter 14: Wireless Packet Capture, Monitoring and Reports
Chapter 15: Settings, NAT Forwarding / Port Mapping and Sys Info
Access Controls / Parental Controls
LAD offers a robust system of access control with scheduling, giving you minute control over the breadth and timing of each devices’ or domain’s accessibility, including DNS firewalling, domain blacklisting / whitelisting, domain group switches, restricting access to the Internet and disabling devices’ ability to connect to your network.
Whether access is allowed is controlled by several mechanisms as described in this section, and the interplay between the different features is moderated as follows. When a client attempts to access a specific domain, LAD first checks whether the specific client is allowed access to the Internet. If the client’s access to the Internet is disabled, access is not allowed and LAD will not check any other settings. If the client is allowed access to the Internet, LAD runs through the following checks to determine whether access to the domain is allowed or not:
- LAD checks if the domain is on either the whitelist or blacklist.
- LAD then checks device-specific settings and if any is contrary to check #1, it ignores the results of check #1.
- If the device’s settings allow exclusions, LAD will proceed to check the domain’s DNS firewalling settings.
- If the domain’s DNS settings allow exclusions, LAD will proceed to check for any subdomain white- or blacklist entries pertaining to the requested domain, and then for any DNS firewalling settings for subdomains pertaining to the requested domain.
DNS firewalling settings and white/blacklisting settings may be manually overridden by means of disabling a device (which removes all of its local and external access privileges), by disallowing its Internet access and by use of domain group switches.
DNS Firewalling
LAD’s DNS-based firewall blocks and allows Internet access by domain name, making it easy to restrict access to both websites and web content as needs be. There are two ways to block domains, one by adding the domain name entry manually and the second by clicking on a domain name from a DNS activity log. DNS activity logs pertaining to a specific domain name may be accessed from the domain name’s info and settings page, while DNS logs pertaining to requests from specific client devices may be found on the individual client device’s info and settings page.
To manually enter a domain name, click on “Domains” from the main menu and type the desired domain name into the “Add New Domain” form. Click on “Add” and a new page will open for you to customize the treatment of the domain name. Please note that any misspellings or mistypings would render the domain controls here useless, as the domain name must match exactly for the controls to work. Please note that www.domainname.com is not the same as domainname.com (www.domainname.com is a subdomain of domainname.com).
The four radio buttons designate the type of access control for the domain.
- "Deny" denies all access to the domain name, including subdomains. For example, setting test.com to Deny, would deny all domain name requests for test.com and all of its subdomains and subdomain combinations (e.g. www.test.com, www2. test.com, a.b.c.d.test.com and all variations of something.test.com), regardless of any separate entries for its subdomains.
- "Deny with Exceptions" denies access to the domain name and its subdomains unless there are specific subdomain exceptions. For example, setting test.com to Deny with Exceptions and creating a separate entry for www.test.com with Allow checkmarked would have the result that the domain test.com and all of its subdomains would be denied except for www.test.com.
- "Allow" allows all access to the domain name, including its subdomains and subdomain combinations (e.g. www.test.com, www2. test.com, a.b.c.d.test.com and all variations of something.test.com), regardless of any separate entries for its subdomains.
- "Allow with Exceptions" allows access to the domain name, including subdomains unless there are specific subdomain exceptions set to deny. For example, setting test.com to Allow with Exceptions and creating a separate entry for www.test.com with Deny checkmarked would have the result that the domain test.com and all of its subdomains (e.g. www.test.com, www2. test.com, test.test.com and all variations of something.test.com) would be allowed except for www.test.com.
To add a new domain name from the list in a DNS log, simply click on the desired domain name to customize the treatment of the domain name.
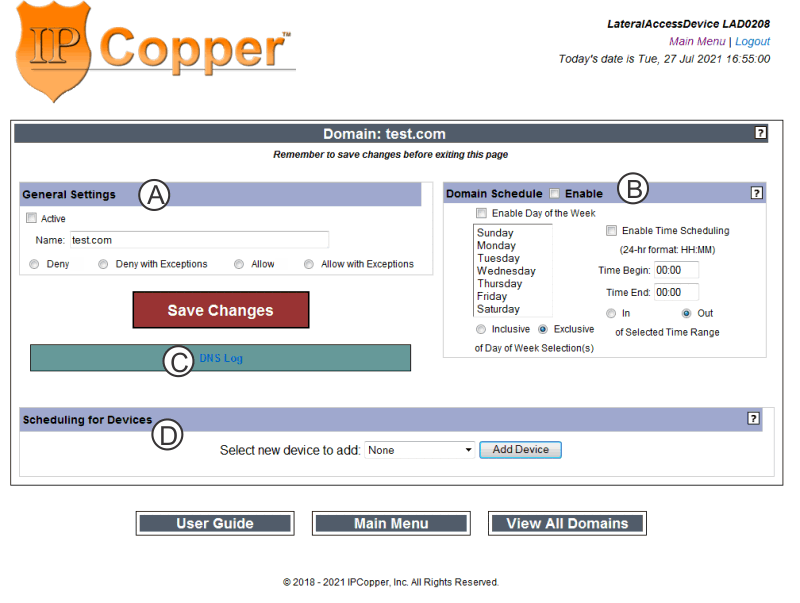
For each domain name you may set a global setting and an optional per-device setting for the treatment of the domain name, which includes Deny All, Deny with Exceptions, Allow All and Allow with Exceptions. Selecting Deny with Exceptions or Allow with Exceptions makes it possible to have one setting for a domain name and a contrary setting for one or more of its subdomains.
- Checkmark “Active” to include the domain name in DNS firewalling.
- Checkmark the desired treatment for the domain name.
- Click “Save Changes.” If you fail to save changes before exiting this page, all changes will be discarded.
Optionally you may create a schedule for when the device’s DNS firewall settings would be applied to a domain name:
1 |
Checkmark “Enable Scheduling.” |
|
2 |
To enable day of week based scheduling, checkmark “Enable Day of the Week” and selecting the applicable days of the week from the list. |
To enable time-based scheduling, checkmark “Enable Time Schedule” and use the 24-hour clock format to designate a begin time and end time. |
3 |
Select either “Inclusive” for the DNS firewall setting to be applied on the selected days or “Exclusive” for DNS firewall setting to be applied on the non-selected days. |
Select either “In” or “Out” to enable application of the DNS firewall settings between the designated begin and end times or outside of the designated begin and end times. |
4 |
The AND/OR selection modifies how the day of week and time range selections interact. Choosing AND makes the day of week and time selections cumulative, while OR makes the selected function operative when the day of week and time selections intersect. |
|
5 |
Save changes. |
|
EXAMPLE: You want a domain disabled for a device on Saturdays and Sundays, and between 6:00PM and 7:00AM all other days.
Set the domain to Deny. Select AND from the dropdown menu and Saturday and Sunday from the list of days. Set the Start Time to 07:00 and End Time to 18:00 and checkmark “Out” of time range.
EXAMPLE: You want a domain enabled Monday through Friday from 8:00AM to 5:00PM and disabled at all other times.
Set the domain to Allow. Select OR from the dropdown menu and the days Monday through Friday from the list. Set a start time of 8:00 and an end time of 17:00 and checkmark “In" time range.
If you would like different DNS firewalling treatment for a specific device, at the bottom of the domain's page you may select the device name under exceptions for specific device and click on “Add Device.” The action and scheduling for this specific device may be set in the same fashion as described above for the general domain.
You may check the effect of your DNS schedule settings on a domain or specific client device by clicking on “Domains” from the main menu. Under “Check Scheduling” enter the domain name to be checked, select the applicable device from the dropdown menu (if applicable) and then select the day of week and time to be checked.
*For more a more detailed explanation of how LAD's scheduling features work, go to Scheduling.
Browser Settings That Affect DNS/Domain Processing
Some browser settings will interfere with LAD's ability to process DNS requests, apply DNS firewalling and maintain DNS logs by encrypting and obscuring your DNS activity. You may disable these features in your browser:
- FireFox: Go to Settings, then Privacy & Security. Scroll down to HTTPS-Only Mode and disable it.
- Chrome: Type "Chrome://flags" and search for DNS. Find "Async DNS resolve" and disable it, and "Secure DNS Lookups" and disable it.
- Edge: Type "Edge://settings" or click on "Settings" in the dropdown menu and select "Privacy, search and services." Under "Security" find "Use secure DNS to specify how to lookup the address for websites" and disable it.
These settings thwart your attempts to control your Internet traffic by domain name by hiding your domain name requests (which are sent out everytime you go to a website) by using HTTPS, which is not the same as HTTP and uses SSL or TLS to encrypt the request, essentially making it impossible to tell what it is. These so-called "secure DNS" features direct your DNS requests to a DNS resolver of the browser maker's choice, rather than getting the information directly from the authoritative DNS registries (which is what LAD does and is how Domain Name Service was originally set up). The interesting thing about their "secure DNS" is that in some situations they may deliver different results from each other and from the DNS registries.
Additionally, by using their "secure DNS" you allow them to track your device, your browser, where you go, tag your browser and build a profile of your Internet use. In normal DNS processing, no one keeps tabs of your requests and it is harder for the authoritative DNS registries to be tampered with.
Domain Group Switches
Domain Group Switches are used to control domain name entries as a group, so that you may manually allow or disallow access to a group of domain names by toggling a switch. The switch manually overrides any scheduling that the individual domains may have. LAD allows you to use up to seven domain group switches.
Active domain switches are listed on the main menu page. If you have no active switches, you may view the full list of switches, active or not, by clicking on "Switches."
To use a domain switch, navigate to the page listing the domain group switches and click on the switch that you would like to work with. On the switch's setting page you may give the switch a name of your choice (click on Save Settings to save your changes).
To associate a domain go to the domain's settings page or the white/blacklisting domain's settings page and use the dropdown menu in the General Settings section to select the desired switch (remember to Save Changes before exiting the page). If the domain you would like to associate does not already have a domain entry or white/blacklist entry, you must create a domain or white/blacklisting entry for it before associating it.
After you add the first domain or white/blacklist domain to a switch, you must restart LAD for the switch to show up as active on the main menu (this is not necessary when adding any other domains, other than the first one).
The switch's status may be toggled either on its individual switch settings page or on the main menu.
Blacklisting / Whitelisting
Domain blacklisting and whitelisting is an alternate way to block or allow access to specific domain names, which does not allow scheduling, but does allow exceptions for subdomains. For information on how white/blacklisting interplays with DNS firewalling and other settings, please see the beginning of this section.
There are two ways to modify the whitelisting and blacklisting functions, through the DNS logs and through the White/blacklisting section of the user interface. In the DNS logs you can blacklist or whitelist a domain with a click. Alternatively, from the main menu click on White/Blacklisting and type or paste the domain name you would like to add under “Add New Domain” and click on "Submit." This will open up a new page (see below). If you wish to blacklist the domain, checkmark "Blacklist". Leaving "Blacklist" unchecked puts the domain on the Whitelist. If you wish to associate the domain with a domain switch, select the desired switch from the dropdown menu. Checkmark "Active" and Save Changes.
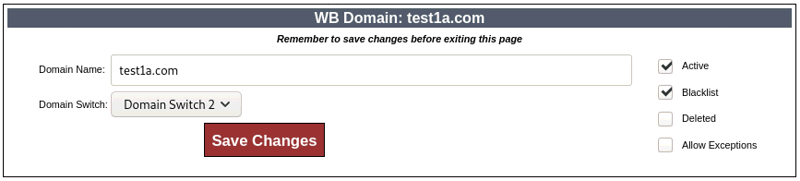
To create subdomain exceptions to domain white- or blacklisting, in the domain settings checkmark “Allow exceptions” and then create a separate entry for the subdomain. For example, you could whitelist “test.com” with Allow Exceptions checkmarked, create a new blacklist entry for “abc.test.com” with the result that test.com would be whitelisted, except for the subdomain “abc.test.com,” which would be blacklisted.
To work with black- and whitelisted domains, click on “White/Blacklisting” from the main menu. In this section you will find separate lists of black- and whitelisted domains. You may click on individual domain names to adjust the settings for any of the domain names. On this page you may also check the effect of domain access scheduling on a specific domain.
Domains may also be added in bulk using the form at the bottom of the White/Blacklisting page, as well as exported in bulk. Use the following format for standard importation ("Import Mixed"):
- domain;#
- # = 1 for whitelist or 3 for blacklist
- one entry per line
- no spaces
If you select "Import Whitelist" or "Import Blacklist," you may simply enter the domain names, one per line. If you do happen to include the semicolon and number when you choose one of these two import options, they will be ignored.
Restrict Internet Access
Individual devices may have their access to the Internet through LAD restricted. This applies whether the device connects wirelessly or through one of the Ethernet interfaces. Simply uncheckmark “Allow Internet Access” on the individual device’s settings page and save changes. To re-enable access, checkmark “Allow Internet Access” and save changes.
Devices restricted from Internet Access would still be able to connect to LAD and the local network through LAD (if local access is allowed).
Device Disabling
Disabled devices will not be able to connect to LAD in any fashion until re-enabled. Because of this you will want to take care when using this feature, to avoid the possibility of disabling the connectivity of a device from which you access LAD’s user interface.
Device disabling completely disallows connection of a specific device to the network through LAD, regardless of any DNS firewalling, blacklisting or whitelisting. To disable a device’s accessibility to the network, find the desired device in the list of Computers and Devices on the main menu. If you have ten or more devices connected to LAD, find the complete list of devices, including those that are currently active and inactive, by clicking on “View All Devices.” Click on the “Disable” button and the device’s connection to LAD will immediately cease.
Individual devices may also be disabled on a day of week or time of day schedule. To set up a device disable/enable schedule, click on the name of the device either from the main menu or click on “View All Devices” to find the desired device and select it.
Find the Device Disable Schedule in the top right corner. You may select to have the device disabled by day of the week or time of day or both. The day of week selections and time ranges operate independently of each other.
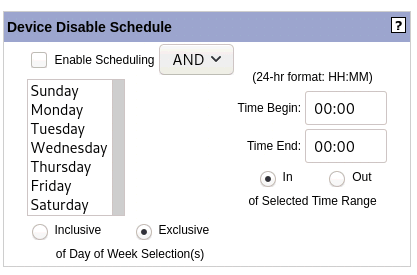
- Checkmarking “Inclusive” for the Day of Week scheduling makes the selected days applicable to the Device Disable Schedule, I.e., the selected days would be the days that the devices is disabled. Checkmarking “Exclusive” makes the non-selected days appicable to the Device Disable Schedule.
- “In” and “Out” of time range options designated whether the applicable device disable time is between the inputted start and end time or outside of them.
- The time is set per a 24-hour clock, meaning 9:00AM is 09:00 and 9:00PM is 21:00.
- The AND/OR selection modifies how the day of week and time range selections interact. If AND is selected, both day of week and time of day conditions must be true for disabling to go into effect, while OR disables the device when either the day of week and time selections are true.
To activate the Device Disable Schedule, checkmark “Enable Scheduling.”
EXAMPLE: You want a device disabled Saturdays and Sundays, and between 6:00PM and 7:00AM all other days.
Select AND from the dropdown menu, select Saturday and Sunday and “Inclusive” selected, while Start Time is set to 18:00, End Time is set to 07:00 and “In” time range is selected
EXAMPLE: You want a device enabled Monday through Friday from 8:00AM to 5:00PM and disabled at all other times.
Select OR from the dropdown menu and the days Monday through Friday from the list. Checkmark “Exclusive,” then set a start time of 8:00 and an end time of 17:00 and checkmark “Out of Range.”
*For more a more detailed explanation of how LAD's scheduling features work, go to Scheduling.
<< SIP Server / VoIP PBX | Scheduling >>