User Guide
Table of Contents
Chapter 1: Introduction / Meet LAD
Chapter 2-1: Installation Tips
Chapter 2-3: Connecting to the Internet
Chapter 4: Configuring a Wireless Network
Chapter 5: Connecting and Managing Clients
Chapter 6: SIP Server / VoIP PBX
Chapter 6-4: Voicemail Boxes / VM Menus
Chapter 6-9: Call Routing & Processing Examples
Chapter 7: Access Controls / Parental Controls
Chapter 10: Network Security / LateralFirewall
Chapter 11: DNS Server and LateralDNS
Chapter 13: Ethernet Packet Capture
Chapter 14: Wireless Packet Capture, Monitoring and Reports
Chapter 15: Settings, NAT Forwarding / Port Mapping and Sys Info
Scheduling
LAD gives users the ability to apply automated schedules to a number of functions, including device disabling and domain accessibility. On this page we will explain the different elements of the scheduling feature and how they interact.
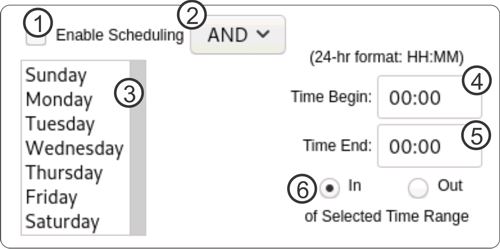
Above is an image of the typical scheduling form, which may be used for scheduling a number of LAD's functions, including domain accessibility, device disabling, ping monitors and groups.
- Enable Scheduling: This checkbox activates the schedule. If it is not checkmarked, the values of the rest of the form will be ignored.
- AND/OR Selector: The form allows users to set two separate conditions: day of the week and time. The AND/OR options affect how the day and time selections interact. If AND is selected, both day and time conditions must be true. If OR is selected either day or time condition must be true.
- Days of the Week: Here you choose the days of the week. The days selected will be the applicable days.
- Time Begin: Here you set the start time, which must be the earlier time entered, in a 24 hour format (HH:MM).
- Time End: Here you set the end time, which must be the later time entered, in a 24 hour format (HH:MM).
- In / Out of Time Range: These two selector buttons indicate whether the applicable time starts from the Begin Time and ends at the End Time (IN) or vice versa (OUT).
Day of Week and Time of Day Conditions
AND SELECTED |
DoW True |
DoW False |
Time True |
Yes |
No |
Time False |
No |
No |
OR SELECTED |
DoW True |
DoW False |
Time True |
Yes |
Yes |
Time False |
Yes |
No |
LAD's scheduling features recognize two time conditions: Day of the Week and Time of the Day. These two conditions may either be engaged separately (i.e., you may choose to set only the days of the week or only the time) or in combination. The two conditions may be combined in two ways using the AND/OR dropdown menu.
When you select AND, both the day and time conditions must be met for it to be applicable. If only one condition is met, but not the other, the schedule will not engage the applicable action.
When you select OR, only one of the conditions, either time or day, must be met for the schedule to engage the applicable action.
The table at right compares the different combinations under which AND and OR operate.
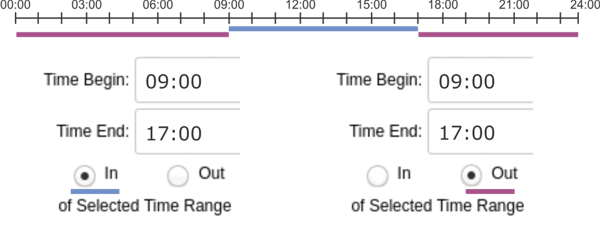
In or Out of Time Range
When setting up your Time of Day condition, you have the option to set the applicable time to within the inputted time range or outside of the inputted time range. Please note that when inputting your begin and end times, you must set the begin time to the earlier time of the day and the end time to the later time of the day. Selecting IN makes the time in between the Start Time and End Time the applicable time, while selecting OUT makes the time outside of the Start and End Times the applicable time. Start Time and End Time should be inputted using military time, i.e., a 24-hr clock (HH:MM).
For example, inputting 09:00 for the Start Time and 17:00 for the End Time and selecting IN makes the time between 9AM and 5PM applicable.
Selecting OUT instead of IN for the above example makes from after 5PM until 9AM the applicable time.
Effect on Scheduling of Domain/DNS Allow and Allow with Exceptions Settings
Please note that scheduling will have no effect for domain/DNS settings if the domain/DNS treatment is set to either Allow or Allow with Exceptions. If you would like to have domain/DNS allowed at some times but denied at others, please use the Deny or Deny with Exceptions options.
<< Access Controls / Parental Controls | Ping Monitors >>